Create a Merchant Center account, verify and claim your store URL, then upload a primary product feed. Those three actions make your products eligible to appear on Google. Before you start, gather admin access to a Google Account, your canonical store URL, and your product data. Merchant Center itself costs nothing to use, but misaligned shipping, tax, or checkout details are a common reason listings get rejected.
TL;DR:
- Ensuring ownership and admin access to your website and Search Console is critical to avoid verification delays and account management issues.
- Matching your business address, contact info, and policy pages on your site with your Merchant Center information prevents manual reviews and disapprovals.
- Verifying your store URL relies on correctly entered links and live verification files or tags, with Search Console linking often being the fastest method.
- For catalog data, using platform connectors or API is best for large, frequently updated inventories, while Google Sheets suffices for smaller, static catalogs.
- Fixing feed issues like missing identifiers, image violations, or product category mismatches speeds up approval, but account-level transparency problems are the main hurdles.
Table of Contents
- Checklist: accounts, site pages, catalog data, and policies to prepare
- Step-by-step: create your Merchant Center account and complete business info
- How to verify and claim your online store URL (methods and troubleshooting)
- All ways to add products and how to choose the right one
- Set shipping, tax, and checkout details so your listings match your site
- Link Merchant Center to Google Ads and enable destinations (free listings vs Shopping ads)
- Use Diagnostics, fix disapprovals, and request reviews (product vs account issues)
- Practical agency perspective: ownership, coordination, and launch speed
- What actually matters when you set this up
- Red Rock Webscapes: managed launch option and contact
- FAQ
- Sources
Checklist: accounts, site pages, catalog data, and policies to prepare
Before you open a browser tab for Merchant Center, line up the pieces that cause the most delay. The account should belong to whoever manages the business long-term, not a contractor who might disappear after launch; a single Google Account can only create one Merchant Center account, so pick ownership deliberately.
Your site needs a few basics in place before Google will trust it enough to show your products:
- HTTPS enabled across the store, not just the checkout pages.
- Visible business name, address, phone number, and email on a dedicated contact page.
- Clear shipping and return policy pages linked from the footer or product pages.
- Accurate pricing and availability that match what customers see at checkout.
- Unique product descriptions and quality images rather than manufacturer boilerplate.
Catalog data matters just as much. Add GTINs or MPNs wherever manufacturers provide them, since missing identifiers are a frequent cause of product disapprovals.
Pro Tip: If a developer or agency controls your website, confirm they will grant you Search Console and CMS access before you begin verification, or the claim step can stall for days.
Step-by-step: create your Merchant Center account and complete business info
Setting up the account takes about fifteen minutes if your information is ready. The fields you fill in here shape which Google surfaces your products can reach.
- Sign in with the Google Account your business controls, then start a new Merchant Center account and select your business country and time zone. This selection is permanent, so confirm it reflects where your business is legally based rather than where you happen to be sitting.
- Enter your business name, address, and contact details exactly as they appear on your website, since mismatches here are a common trigger for manual review.
- Choose your selling countries and currency, which determine shipping and tax destinations later in setup.
- Decide whether you need a standalone account or a Multi-Client Account (MCA). An MCA makes sense if you manage several stores or help other merchants manage theirs, since it lets one login oversee multiple sub-accounts without separate logins for each.
Business identity fields are not a formality. They feed directly into which Shopping destinations your products qualify for and whether tax calculations apply correctly at checkout.
How to verify and claim your online store URL (methods and troubleshooting)
Verification proves you own the site; claiming links that domain exclusively to your Merchant Center account. Google offers several verification routes, and which one works best depends on your platform and who has access to what.
- Connect directly through supported e-commerce platforms like Shopify or BigCommerce, which often verify and claim in one step.
- Use an existing Google Search Console property if you already have one linked to the domain.
- Add an HTML tag to your site header or upload an HTML verification file to your server root.
- Verify through Google Tag Manager or Google Analytics if either is already installed site-wide.
Claiming typically happens once per domain and requires someone with edit access to the live site, not a staging environment. If verification fails, double-check that you entered the exact URL format Google expects, including the correct subdomain and protocol, and confirm the verification file or tag is live rather than sitting in a draft.
Pro Tip: If you already use Search Console for SEO, link that property first. It is often the fastest verification path because Google already trusts the association.
All ways to add products and how to choose the right one
Once your site is verified, you need product data flowing into Merchant Center. Google supports several methods, and the right one depends on catalog size and how often your inventory changes.
- Automatic collection: Google reads structured data (schema.org markup) directly from your site pages, useful as a backup or for very small catalogs.
- Platform connectors: Shopify, BigCommerce, and WooCommerce offer built-in integrations that sync your catalog automatically.
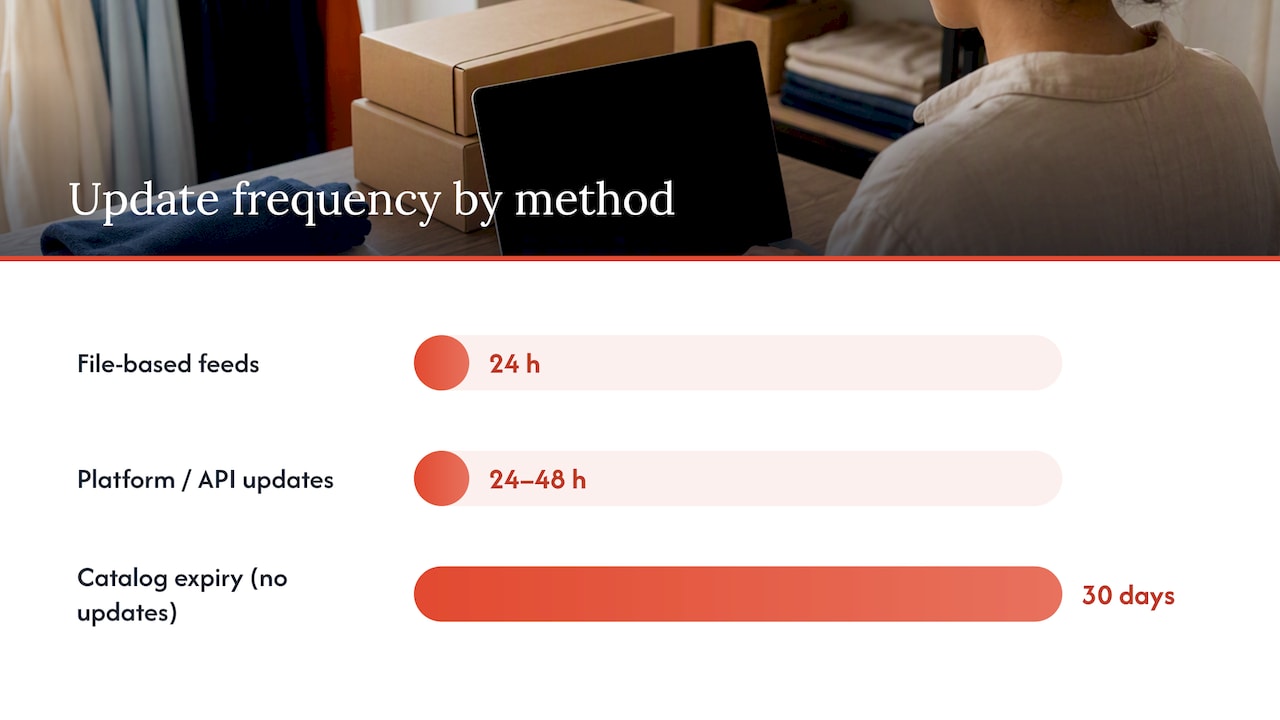
- File uploads: a scheduled fetch of a spreadsheet or XML file hosted on your server, commonly refreshed every 24 hours.
- Google Sheets: a lightweight option for small catalogs managed by hand, synced on a schedule you set.
- API: the Merchant API for developers managing large or fast-changing catalogs programmatically.
For a catalog under a few dozen items, Google Sheets is often the simplest starting point since there is no development work involved. Shopify or BigCommerce sellers should use the native platform connector rather than building a separate feed, since it keeps the source of truth in one place. Larger catalogs with frequent price or stock changes benefit from file-based fetches or the API, since manual updates do not scale past a few hundred SKUs.
Update frequency matters more than most merchants expect. File-based feeds can be scheduled every 24 hours, while platform and API-managed updates commonly take 24 to 48 hours to appear in Merchant Center. Accounts relying on the API should refresh data regularly, since catalogs left untouched for 30 days or more can expire. Whichever method you choose, getting accepted into Merchant Center is only the first hurdle; understanding why your checkout tasks keep failing can help prevent common issues that block product visibility. Each item still needs to pass product-level validation that checks landing page parity and policy compliance before it becomes eligible to actually show on Google.
Set shipping, tax, and checkout details so your listings match your site
Shipping and tax settings live in two places: account-level defaults and item-level overrides for specific products. Account-level settings apply broadly, like a flat shipping rate for your whole catalog, while item-level settings override that default for exceptions like oversized items or free-shipping promotions.
Whatever you configure in Merchant Center needs to match what a shopper actually sees on your product pages and at checkout:
- Carrier name, handling time, and transit time should mirror what your shipping policy page states.
- Shipping costs in the feed should match checkout totals exactly, not an estimate.
- Return policy terms should be visible on the product page, not buried in a separate FAQ.
US merchants must configure tax settings during onboarding, since Merchant Center will not approve products without a defined tax policy for applicable states. Keep shipping and tax settings synchronized with your site on an ongoing basis. Mismatches between your feed and checkout are one of the more common reasons otherwise clean feeds get flagged.
Link Merchant Center to Google Ads and enable destinations (free listings vs Shopping ads)
Connecting Merchant Center to Google Ads opens up both free product listings and paid Shopping campaigns.
- From Merchant Center settings, link your account to a Google Ads account you administer, then approve the link request from the Ads side to confirm it.
- Enable the free listings destination, which lets eligible products appear in Google Shopping results at no cost per click.
- Treat free listings as an early readiness check: if products show up there without disapprovals, your feed and site data are likely solid enough to support paid Shopping ads too.
- Expect a short delay after linking and enabling destinations before products actually become visible, since Google needs to process the new data flow.
Free listings cost nothing to enable and often surface setup problems before you spend a dollar on Shopping ads.
Use Diagnostics, fix disapprovals, and request reviews (product vs account issues)
Merchant Center’s Diagnostics page is the single best place to see what is blocking your products. Open the “Needs attention” section to separate product-level issues, which affect individual offers, from account-level issues, which can disable your entire catalog or suspend the account if left unresolved. Diagnostics clearly flags which category each issue falls into, and you can export a CSV of affected items to work through fixes in bulk.
Common product-level fixes include:
- Correcting price or availability mismatches between your feed and live site.
- Replacing images that violate Google’s size, watermark, or background requirements.
- Adding missing GTINs or MPNs where identifiers exist but were left out.
- Updating product categories to align with Google’s product taxonomy.
Account-level issues, by contrast, usually trace back to site transparency problems, like missing contact information or an unclear return policy, rather than anything wrong with the feed itself. Fixing one item will not resolve an account-level suspension.
Once you have corrected the underlying issue, submit a review request through the “I fixed the issue” flow, and be ready to complete identity verification if prompted. Review timelines vary by issue type: Shopping ad reviews commonly take 3 to 5 business days, account reviews around 7 business days, and complex cases longer. Submitting a review request before the fix is actually live tends to trigger a cool-down period before you can request again, so confirm the change is visible on your site first.
Pro Tip: Fix the root cause before requesting a review rather than appealing repeatedly. Repeated unresolved appeals often extend the cool-down window instead of speeding things up.
Practical agency perspective: ownership, coordination, and launch speed
The most common failure we see is not a bad feed, it is bad coordination. Someone sets up Merchant Center with an email that leaves the company, or a developer verifies the site but never hands over edit access, and the whole account becomes unmanageable later. Securing site edit access and linking Search Console before you touch verification solves most of this upfront.
The second most common failure is data living in three places at once: the CMS says one price, the feed says another, and checkout rounds differently. Syncing product data, your CMS, and checkout to a single source of truth prevents the mismatches that drive disapprovals.
For merchants who want this handled rather than pieced together, a managed launch program that builds the store and feed alignment together from day one tends to produce a cleaner Merchant Center approval than retrofitting an existing site.
What actually matters when you set this up
Most guides treat Merchant Center setup as a feed problem. It is not. The feed is usually the easy part, since spreadsheets and platform connectors handle the mechanics well. What trips up small merchants is everything Google checks around the feed: whether your return policy page actually exists, whether your checkout shipping cost matches what you declared, whether the business address on your site matches what you typed into the account.
Conventional advice spends too much time on feed formatting and not enough on ownership. If you do not control who has edit access to your site and your Search Console property, you do not really control your Merchant Center account either, no matter how clean your product data looks.
If you take one thing from this guide, prioritize account and site ownership before you touch feed optimization. A perfectly formatted feed sitting on a site with no transparency pages will still get flagged, while a modest feed on a transparent, well-coordinated site clears review faster.
— George
Red Rock Webscapes: managed launch option and contact
Setting up Merchant Center is straightforward on paper, but the friction usually comes from the website side: missing policy pages, inconsistent checkout data, or nobody holding admin access when verification time comes. Our Website Launchpad program builds that alignment in from the start, so your product data, shipping settings, and checkout match before you ever submit a feed.
For merchants rebuilding an existing store specifically to pass Merchant Center review, our e-commerce builds include:
- Site structure and policy pages configured to match feed requirements from launch.
- Managed Core, Growth Care, or Commerce Care support plans for ongoing catalog and site changes.
- Coordination between your CMS and product feed to avoid the mismatches that trigger disapprovals.
If you would rather handle setup yourself, everything above gets you there. If you want it built right the first time, reach out about Website Launchpad.
FAQ
Is Google Merchant Center free?
Yes, creating and using a Merchant Center account costs nothing. You only pay separately if you choose to run paid Shopping ads through a linked Google Ads account.
How does Google Merchant Center work?
Merchant Center collects your product data through a feed, whether uploaded as a file, synced from a platform, or pulled automatically from your site, and distributes that data to Google Shopping, free listings, and other Google surfaces. Each product passes through validation checks before it becomes eligible to appear, which is why Diagnostics plays such a central role in troubleshooting.
How do I get approved on Google Merchant Center?
Approval depends on completing account verification, claiming your site URL, and ensuring your product feed matches what customers see on your site and at checkout. Transparent business information, like a visible address and clear return policy, along with accurate shipping and tax settings, reduces the chance of a disapproval during review.
Is a Google Pay merchant account free?
Setting up a Google Pay merchant account does not carry a signup fee, though it is a separate product from Merchant Center and not required to list products on Google Shopping. Payment processing fees, if any, depend on the payment provider you connect rather than Google Pay itself.
Sources
- Get started with Merchant Center – Google Merchant Center Help
- Products frequent updates – Merchant API